
So I just received a very inspiring email from an amazing mom and my best friend Jenny. She has been following her new favorite blog and shared a post that she read from it. I was in tears as I read it because I felt really guilty. We bought our Christmas tree late Saturday night and Hanna has been very excited to decorate it. So Saturday was too late to do anything with it. Then Sunday we had church and then company for dinner it just got too late again. Monday rolled around she went to a friends house and then again we had company from out of town stay the night and it still did not get done. She has been begging me to help decorate the tree and I have been putting it and her off because I have been too busy. I have been too busy Christmas shopping, cleaning, cooking, work, etc., etc. Thank you so much Jenny for this because I have woken up and realized that I am putting off precious memories. Christmas is about family,giving love and building memories. I will never forget this and tomorrow will change my priorities. Here is the post:
Young@Heart
By Pam Young
I was at Michael's (the craft store) in the late afternoon when I heard a conversation in the next isle between a mother and her six-year-old child.
"Oh, Mama, look at this!"
"Uh huh."
"I love this!!"
"Uh huh."
"I have one don't I!!!"
"Uh huh."
"You made it for me didn't you Mama!!!!"
"Uh huh."
As I listened to the excitement and love for her mother in the child's voice and the drone of her mother's responses, tears welled up in my eyes. I thought about how many times I'd done the same thing with my children when they were young. After all, I had a centerpiece to make, a decoration for the coffee table to think about, colors to consider, people to impress and not enough time! At that moment in Michael's I would have given anything to go back to just one time in the isle of a store, hear my child's voice and not miss what was really happening. Love, joy adoration. The stuff of Christmas!
My kids are grown now and I'll never again hear their little bell voices exclaiming their joy over something. That time is gone forever.
I had to get to the next isle and see the child! With tears streaming down my cheeks, I peeked around the corner and looked at the small girl's happy little face. She had a dress on and her hair was dark brown in shoulder-length curls. She was holding a Christmas stocking with a Santa Claus on it. She looked up and smiled at me. Then I looked at her mother. She was tired; I could see it in her eyes. But when she looked into mine she smiled seeing my love for her child and the moment.
I told her what had gone through my mind listening to their conversation. Her tears started to collect and she said, "Now you're making me cry." She dabbed her eye with the back of her wrist, "Thank you, I needed to hear this. I get so busy and it's easy to neglect her natural enthusiasm." I told the mother it was obvious that the child had not been neglected, because she was such a happy little girl, and that I understood how easy it was to get wrapped up in our own thoughts and miss these holy moments.
I left Michael's knowing I wanted to write about this. Your children adore you and they are like little joy dispensers, especially during this time of year. Since it is also an especially busy time for you, it can be so easy to miss those gifts of love and joy your children are eager to give to you. They are gifts that can't be wrapped up with festive paper or charged on American Express. Stay awake! This is a holy time.
Merry Christmas!
Pam
Tuesday, December 7, 2010
Wednesday, December 1, 2010
Parenthood
 I was on the computer catching up on some of my favorite blogs and I had to share this quote from the Steve Martin movie Parenthood, posted from Little Miss Momma. (I have not watch this movie since I have become a parent so I am putting it on our Netflix que.) This is from the crazy old Grandma:
"You know, when I was nineteen, Grandpa took me on a roller coaster.
Up, down, up, down.
Oh, what a ride!
I always wanted to go again.
You know, it was just so interesting to me that a ride could make me so frightened, so scared, so sick, so excited, and so thrilled all together!
Some didn't like it.
They went on the merry-go-round.
That just goes around.
Nothing.
I like the roller coaster.
You get more out of it."
-Grandma from PARENTHOOD (The Movie)
Life is like a theme park ride.
Will you chose the roller coaster
or the merry-go-round?
Tuesday, November 30, 2010
Ava's Birthday Cake


My little Ava turns 3 today! Her favorite princess is Snow White and so I really wanted to make a princess cake. I was going to buy a barbie pan at Michael's but then thought that my giant cupcake pan might work. I just used the top of the giant cupcake pan and then broke the legs off of one of the many Barbies we had and stuck it on top after it was done baking. We iced the cake with a cake frosting tool and then Hanna sprinkled red sprinkles all around it. She loved it! Happy Birthday Ava!

Monday, November 22, 2010
Almost Thanksgiving!!!!
 Thanksgiving is one of my favorite holidays! The first picture is of the girls wearing paper Thanksgiving costumes. Hanna is missing her Indian headband. I cannot take credit for this though. Ava brought them home from pre-school and they were so cute I had to share! I found a website that gives instructions on how to make these costumes. Lastly every year for the past 12 years I have been making pumpkin rolls for family and friends. I have been told they are pretty tasty so I keep making them and every year it seems like I make more and more but I have gotten a pretty good system down so it is not too bad. Here is the recipe:
Pumpkin Roll
Pumpkin Batter:
3 eggs
1 c. sugar
2/3 c. pumpkin
1 tsp. lemon juice
2/3 c. flour
2 tsp. cinnamon
½ tsp nutmeg
½ tsp ginger
½ tsp salt
1 tsp baking powder
chopped walnuts (optional)
Filling:
1 c. powdered sugar
6 oz cream cheese softened
4 tbsp butter
½ tsp vanilla
Preheat oven to 375 degrees. Spread parchment paper over a cookie sheet to fit the length of the cookie sheet. Beat eggs, sugar pumpkin and lemon juice until creamy. In a separate bowl mix dry ingredients and then add to pumpkin mixture. Pour mixture over parchment paper and spread until even leaving an inch on each side. Sprinkle nuts over mixture. Bake for 15 min. Coat a clean dish towel with powdered sugar enough for the roll to fit over. Once the pumpkin roll is done baking flip upside down onto the sugar-coated dishtowel. Carefully tear the wax paper off the pumpkin roll. Roll the towel with the pumpkin roll in it be careful not to roll it too tight. Chill in refrigerator until cool. To make filling mix all ingredients until creamy. Once pumpkin roll is chilled spread cream cheese filling over the entire surface. Spread evenly and then roll back up to refrigerate.
 I first wrap in foil and then wrap them in some muslin fabric and found these free cute little tags here. It is kinda hard to read but it says, "From The Kitchen Of" and then at the top it says "Please pass the stretchy pants." Hope everyone has a great Thanksgiving!!!
Monday, November 15, 2010
Little Hands, Big Helpers!!


 Fall is here!! I wish the trees would stay red and yellow longer than a few weeks but at least for kids they have the joy of playing in the fallen leaves. We had a huge pile in our front yard that the girls got to play with. To get your kids to help with those leaves piles you can make some scoopers for their little hands. I went to the Dollar Store and bought some gloves and super glued them to pie pans. Note do not use the disposable ones showed, they were too flimsy. Next time I am going to buy actual pie tins, which they have at the Dollar Store as well. The girls were able to pick up big piles and help with the yard work.
Wednesday, November 10, 2010
A New Playhouse
 The girls love to play in tents and we have a few princess tents. To be honest I dread getting them out. They are always in the middle of the living room and they are difficult to fit back into the bags they came in. My husband had to Youtube a video just to figure out how to fold it back into the bag! So I came across this idea in a magazine and I instantly fell in love with it. I made a playhouse tent that fits over our dining room table so that way it is easy to put up and a way and does not take up any space. I added felt flower pots and a felt welcome sign. I still want to add more like a fence and grass around it. Maybe some felt furniture on the inside. If you have boys that are not into playing house you could make a hospital, animal clinic or a fire station. My table is 4 1/2 x 4x1/2 and it took about 9 yds of muslin fabric, I don't think I paid more than $4 with a coupon at Joann's. I measured it out on my table and then sewed the edges together so it would have a snug fit and not fall off. I used scrap pieces of felt that I had so this was a really low cost project and the girls loved it!
Monday, November 8, 2010
Candy Bar Cookies

We have so much candy lying around from Halloween that I wish would disappear. Every time I go to the pantry I grab a piece of candy and we still have hardly put a dent in it! . I thought I would try and get rid of some of it by using it in my cookies. I just used what we had, Snickers, Baby Ruth, Milky Way, Fast Break and 3 Musketeers. So yummy!
Candy Bar Cookies
2 sticks butter softened
1 C of brown sugar
1/2 C of granulated sugar
2 eggs
1 tsp vanilla
2 1/2 C of flour
1 tsp baking soda
3/4 tsp salt
1/2 chocolate chips
12 mini size candy bars or 2 full size candy bars, chopped
Pre heat oven to 350 degrees. Mix butter with sugars until well combined. Add vanilla and eggs one at a time and mix until well combined. In a separate bowl mix flour, baking soda and salt. Slowly add to the wet ingredients until well combined. Add chocolate chips and and candy bars and mix lightly until folded in. I make my cookies soft so I only baked them for 9 min. For a crisper cookie bake 11 min.
Enjoy!!
Saturday, November 6, 2010
New Art Room

Before
Do you have one of those rooms under the stairs? This is the first time I have had one and as you can see the before picture it became a misc/junk closet. The picture actually looks good. I didn't think to take the picture until after I cleared all the stuff off the ground. I felt like it was a waste of space. The girls like to play in it and I thought of maybe putting their kitchen and food toys in there but then I had a flash forward of our living room covered in food toys....so no. Instead I decided to do an art/learning room.

After
 These are great learning posters from the Dollar Store,2 come in a pack. I laminated them so they do not get ruined and then the girls can take dry erase markers and practice their letters.
 I have my cheap paper from an earlier post stuck to the wall with putty so they can color or water color on. I also have their learning board from an earlier post about things we learn each week and their art hangers .
So far it has been a success! They love to color and play in it, Hanna calls it her pre-school room(even though she is in Kindergarten)
Thursday, November 4, 2010
Halloween Party Continued..........
 I had the party on Friday, before Halloween so I thought it would be fun to go trick or treating a before anyone else does. I asked my neighbor's in my cul-de-sac if it was okay and provided extra candy for them. It was fun taking such a big group. After trick or treating we played pin the spider on the web. Here is a link for the game. I had the web enlarged to 12x18 and kept the spiders the same size.
 This had to be my favorite part of the night. I ran out of games and the kids were going a little crazy from all the candy and junk so one of the mom's came up with a great game. This is called Graveyard and who ever could be dead the longest wins. Genius! Some of these kids were stones it was hilarious!
 Here is Hanna trying her hardest to be......dead :) Hope everyone had a fun Halloween!
Halloween Party!!!
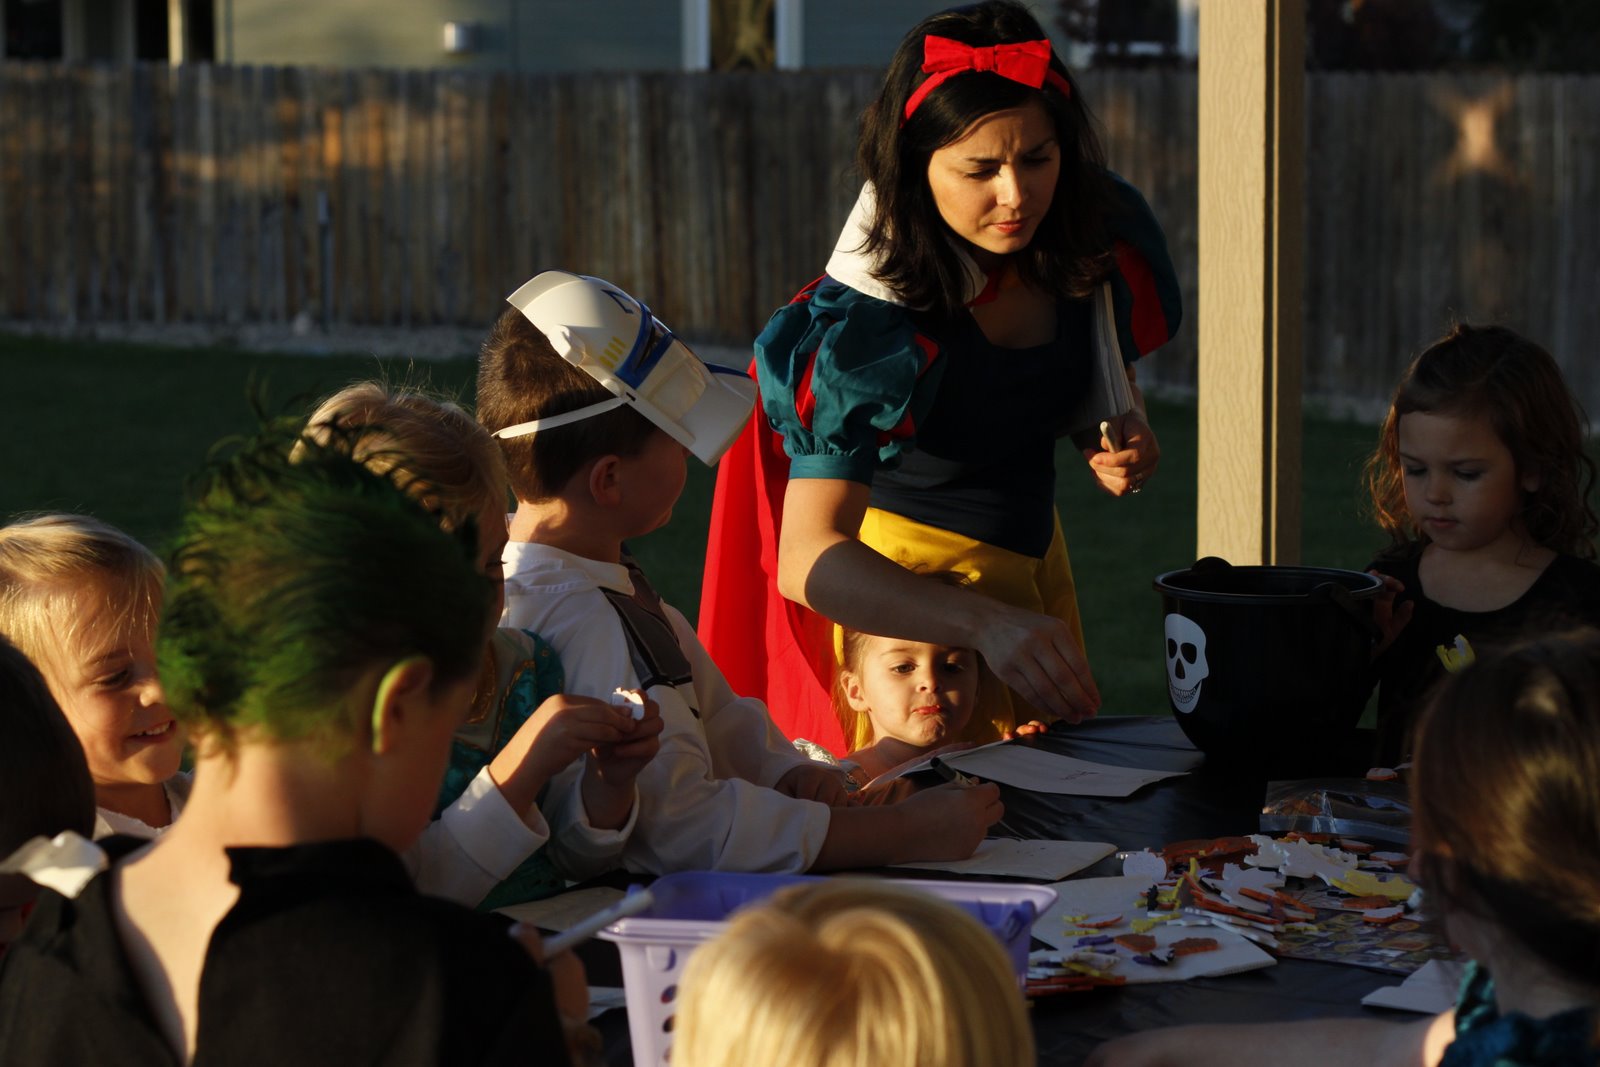
My oldest daughter Hanna loves to party! Anytime there is a holiday or birthday's she is excited and counting down the days. She is already counting down to Thanksgiving she says "We are going to Grandma's to have a feast!" Love it. So since I decided to throw a Halloween party for all of my daughter's friends. 24 kids to be exact came! Below are some pictures.
Here is the treat table. Everything was orange and black. I fed them so much junk, I kinda felt bad but I figure Halloween only comes once a year :) Almost had one casualty, one little girl thought she was going to throw up but she was fine. So we had Cheetos, Doritos,black licorice,Halloween Oreos, chocolate doughnuts, candy corn, cookies and Reeces Pieces.

I had to show off my awesome costume that I borrowed from a friend. Here are the kids making their treat bags. I bought a bunch of Halloween stickers and Halloween sticky foam pieces.

 Here are my beloved cupcakes that didn't turn out as cute as I hoped but I was on a time crunch. For the spider cupcakes there are chocolate sprinkles on top and Reeses Pieces eyes and for the legs they are black licorice that I had to cut in halves because I could not find black licorice ropes, otherwise use ropes it will save a lot of time. The skull cupcakes were made with two mini marshmallows tucked in the cupcake wrapper and then frost over them. Top with chocolate chip and mini chocolate chips.
 This was pumpkin,pumpkin,jack-o-lantern (instead of duck,duck,goose). We also played hot pumpkin (like hot potato) with a little pumpkin.
Here is the treat table. Everything was orange and black. I fed them so much junk, I kinda felt bad but I figure Halloween only comes once a year :) Almost had one casualty, one little girl thought she was going to throw up but she was fine. So we had Cheetos, Doritos,black licorice,Halloween Oreos, chocolate doughnuts, candy corn, cookies and Reeces Pieces.

I had to show off my awesome costume that I borrowed from a friend. Here are the kids making their treat bags. I bought a bunch of Halloween stickers and Halloween sticky foam pieces.
 Here are my beloved cupcakes that didn't turn out as cute as I hoped but I was on a time crunch. For the spider cupcakes there are chocolate sprinkles on top and Reeses Pieces eyes and for the legs they are black licorice that I had to cut in halves because I could not find black licorice ropes, otherwise use ropes it will save a lot of time. The skull cupcakes were made with two mini marshmallows tucked in the cupcake wrapper and then frost over them. Top with chocolate chip and mini chocolate chips.
 This was pumpkin,pumpkin,jack-o-lantern (instead of duck,duck,goose). We also played hot pumpkin (like hot potato) with a little pumpkin.
Frakenstein's Coffin Cake


I LOVE Halloween!! Here is the Frankenstein's coffin cake I made for my daughter's fall carnival. (I know it is a little late but keep it in mind for next year)
Ingredients:
1 thawed Sara Lee pound cake
1 tub of vanilla or white frosting
red and blue food coloring
About 11 oreos
1 large marshmallow
9 small marshmallows
Black cookie gel
Green sugar sprinkles
Gummy worms
1.Make frosting by adding red and blue food coloring to your frosting. This was trial and error for me. I just kept adding and mixing until i git the right color for the coffin. I was going for a grayish color.
2.Cut the cake in the middle for the coffin.
3. Place cake on serving dish and frost the bottom piece of the coffin. Frost the back side where the top part of the coffin will go, it acts like glue a little bit.
4. Mash 10 of the Oreos in a shallow casserole dish big enough to dip the top part of the coffin into.
5.Frost the top piece of the coffin. This part gets a little messy. Then dip it in the oreosall the way around. except the inside of the coffin.
6. Place next to bottom piece of coffin so it is propped open.
7.For the Frankenstein place an Oreo first near the middle. Dip your marshmallows in water and then rub into green sugar crystals. Arrange to make Frankenstein like picture.
8. I made a happy face with black cookie gel but I think next time I might make him look more scary.
9. Place leftover Oreos around coffin to act like dirt. Then throw in some gummy worms coming out of the dirt.
My kids loved it!
Monday, October 25, 2010
Sweet Pumpkin Seeds

Pumpkin carving is in the air. Here is a great recipe to make a perfectly healthy snack unhealthy :) That is the great thing about the holidays !!!
Sweet Pumpkin Seeds
2 c dried pumpkin seeds
2 T melted butter
3 T brown sugar
1/2 t salt
1/2 t cinnamon
Dry pumpkin seeds 300 degrees for 30 min. Mix all ingredients together. Spread over parchment paper lined cookie sheet and roast at 350 for 15 min.
Wednesday, October 20, 2010
The Giving Tree
 I saw this idea in a Pottery Barn catalog and had to replicate it. The idea of it is to have the family write down one thing they are thankful for each day in the month of November in the spirit of Thanksgiving. I thought this would be a great family tradition and would be fun to look back as the kids get older the things they said they were thankful for. Also it would be a daily reminder to count our blessings.
Materials needed:
1 yd of brown felt
1/2 yd of green felt
1/2 yd of yellow felt ( I found a mustard yellow to go along with the fall colors)
1/4 yd of 4 different fall looking fabrics
Fabric glue or glue gun
I have to say it was a little time consuming cutting out all the leaves and numbers. I am sure there is an easier way of doing it. Just make sure that you make pockets out of the leaves so that way the notes can be placed in each leaf. Please feel free to leave a comment or email me for the template.
Thursday, October 14, 2010
Cheap Fun Paper

Today was my turn to teach preschool again. I was excited to use our news paper roll and it was a great change of pace for the kids to get out of their seats and sit down on the ground to color. So I just had to post what great paper this is especially for large groups. They are the ends of the newspaper rolls. They sell them at the Idaho Press Tribune, in the front, for $2 a roll regardless of size. It is kinda hard to tell how much is on the roll in the picture but trust me we will not be running out any time soon. Such a great deal and fun for the kids to color on the floor. If you are not from this area call your local newspaper to see if they do this.
Tuesday, October 12, 2010
Making Pizza
 Today was my turn to teach preschool. Thought it would be more crazy with 8 kids but it actually went really well. Making pizza was a hit so I thought I would share. The kids are learning shapes and this activity is great for shapes and colors. I first cut out triangles from paper grocery bags and fold over the end to make a crust. I cut out red circles for pepperoni, large orange triangles for cheese, small yellow rectangles for pineapple, pink squares for ham, small green triangles for bell peppers (the kids changed them to pickles though) and black circles with a hole punched through the center for olives. I started with cheese and from there used one shape at a time. They glued on one topping at a time so they could get familiar with the shape. They had a great time learning their shapes as well as pretending to be little chefs!
Monday, October 11, 2010
Caramel Popcorn

Well it's not really baking, more like microwaving but so yummy! For Sunday baking
we made caramel popcorn. We went to the pumpkin patch Saturday and it really put me in the fall mood. The girls didn't help with this one because the caramel gets really hot and sticky. I got the recipe from a friend of mine and is by far the best recipe for caramel corn, so thanks Courtney!
Microwave Carmel Corn
1 Bag of popped popcorn
1/3 C of butter
2/3 C firmly packed brown sugar
1/3 C light corn syrup
1/4 tsp baking soda
1/2 tsp vanilla
Microwave butter in a 4qt microwave safe glass bowl until melted. Stir in brown sugar and corn syrup until mixture bubbles, stir once. Microwave on High 3 minutes without stirring. Stir in baking soda and vanilla. Stir in popcorn and mix well. Microwave at 70% power for 1 minute. Remove and stir. Repeat again at 70% power for 1 minute. Stir,once all mixes spread out onto a cookie sheet lined with wax paper to cool.
I think next time I will add peanuts or candy. Beware you cannot just have one!!
Wednesday, October 6, 2010
Halloween Ghosts

 I thought these were fun little friendly ghosts to add to our Halloween decorations. Supplies you will need: Cheese Cloth sold at Walmart or Joanne's,liquid starch,black felt for the eyes, hot glue glue gun, 2 cups and a small balloon. Tape 2 cups together and place a small blown up balloon in the top cup. Soak a piece of cheese cloth big enough to drape your balloon in the liquid starch. Drape over and let dry. We let ours dry overnight. Once dry pop the balloon with a needle and remove from cup. Add eyes with a hot glue gun. This was very kid friendly and a fun project. For step by step instructions visit:http://www.countryliving.com/crafts/projects/ghost-craft-1010

Friday, October 1, 2010
Bite Size Caramel Apples
 I love fall and everything about it, I have been trying to finds some fun things to do with the girls for when the weather gets colder. I found these on another blog and thought they were so cute. I love caramel apples but they are so big. These are perfect for kids! You need a melon baller to scoop out the apple balls. Dip into melted caramel and use pretzel sticks for the stick. Perfect for Fall!
Wednesday, September 29, 2010
Silly Squids


Subscribe to:
Posts (Atom)